

In this lesson, we go over the Ongoing calls screen in the desktop version of the software and the actions that can be performed from there.
Objectives of the lesson :
- Understand all the information that is listed in this table
- Know what actions you can take from there
THE BASICS
Once a call that needs to be executed during the current day has been dispatched to a driver, it will be placed in the Ongoing status.
By clicking on the “Ongoing” tab in the top menu in the back office version of TowSoft, you will be able to see all the calls that are in that status. The number in the red circle in the top right corner of it indicates total number of calls that are currently in that status (for when you are not in that actual screen).

Ongoing tab in TowSoft
In that screen, you will find a table with the relevant details pertaining to the calls.
THE ONGOING CALLS TABLE, IN DETAIL
Here are the different columns you will find in that table and an explanation of them.
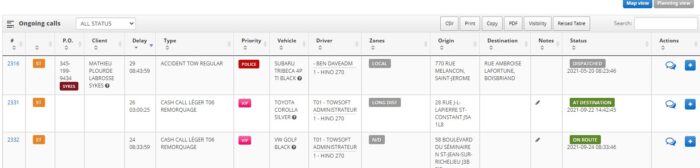
The Ongoing calls table
# -> The # that was assigned to the call by the TowSoft system.
2nd column -> The base (branch of the company) as defined in the “Companies and options” settings. The colour of the label is the one that was chosen when configuring the base and the abbreviation is what was defined in “Company Short Name”.
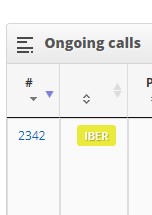
Base label in the Ongoing calls table

Defining the base in the Companies and options settings
P.O. -> The number (if any) that confirms that the call was approved by the client and that can be referred to if needed.
Client -> Name of the customer / vehicle owner on the road (top of cell, if any), as well as the name of the roadside assistance company (bottom of cell, in bold writing, if any)
Delay -> Elapsed time since the call was created the TowSoft system. If the delay adds up to days, you would see the number of days of delay first, then the time adds to that.
Type -> Will display the actual service that is required on site and, in a label, the type of intervention (if one was associated to the service when your admin configured it).
Priority -> Level of priority as defined by your system administrator in the “Companies and options” settings.
Vehicle -> The vehicle that will be loaded onto the truck if known at the time the call was created.
Driver -> The driver that the call was dispatched to as well as the tow truck that is being used for the call.
Zone -> Zone associated with the call based on its location and according to the zones that were configured by your administrator.
Origin -> Address of the Site / location of intervention.
Destination -> Address of the vehicle drop off site / location
Notes -> Notes added to the call when created by the dispatcher or admin.
Status -> The last status update provided by the driver as well as the time at which it was recorded in the system.
Actions -> Contains the different actions that can be performed from this table.
WHAT YOU CAN DO FROM THIS SCREEN
View the complete order details -> Click on the call number in the first column.
Add / edit the priority level -> Click on the priority label that was assigned to the call, change it and click the modify button.
Edit the vehicle -> Click on the vehicle information or on the pencil icon if none is entered.
Add / edit the zone -> Click on the zone label that was assigned to the call, change it to another one of the options from the dropdown and click the modify button.
Add / edit the notes -> Click on the notes or on the pencil icon if none is entered.
Edit the call status -> Click on the status label that was assigned to the call, change it to another one of the options from the dropdown and click the modify button.
Read & communicate in call chat -> Click on the conversation bubble icon in the Actions column. This will open the call conversation panel. You can see notes added by the operator from there and communicate with him/her regarding this specific call (only available for drivers using the TS4 mobile app).
Duplicate the call -> Click on the “+” button in the Action column and fill in the new details and what should be cloned.
See tow truck location on a map -> Click on the location icon in the Action column. A new window with the truck position on a map will open up. If this button isn’t present, it is because the truck that is being used is not equipped with an electronic GPS logging device or that the driver did not grant access to .
Sort columns -> Click on the title of any of the columns to sort the calls alphabetically according to their content in that column. Click again to sort in the opposite order.
Export table -> Export the table as a CSV (MS Excel, Google Sheet, etc.), print it out, generate a PDF for it or copy it to the clipboard in order to paste it somewhere else by using the buttons at the left of the search bar.
Toggle column visibility -> By clicking on the “Visibility button”, you’ll be able to choose to hide a few columns from the table.
Update table content -> Click on the reload table button. This will only refresh the content contained within the table without refreshing the whole page.
Search in the table -> Type something in the search bar at the top right corner to try to find something contained in all of the listings.
Get a map view -> Click on the “Map View” button just above the search bar to see scene locations of the calls on a map.
Get a planning view -> Click on the “Calendar” button just above the search bar to view calls according to the driver they were dispatched to.
Take a new call -> Press on the blue button at the bottom of the table to take a new call from that window.
* Note that the table displays a maximum of 100 calls per page. To get to the next pages, scroll down to the bottom of it and click “Next”.
List of comments